

Here’s some step-by-step instructions on using a label template in MS Word 2010 to create QR code sticker labels from a pre-made set of QR codes using the mail-merge function. We’ve used the Avery 22805 label template (1.5″ x 1.5″ 24 per sheet) but you can use any digital label template you want.
The point we’re assuming you’re currently at is that you’ve already created your QR code images and have saved them locally into a folder on your computer, and the end result of the instructions shown below will be a sheet of labels containing each of these previously created QR codes.
Create A Data Source
The mail-merge process intially requires a “data source” which should be prepared first. The data source contains the path location on your computer for each of the indivdual QR codes images that will be displayed in each of the labels (24 in our case since we are creating 24 different stickers on a single sheet of labels). The simplest way is to create an MS Excel spreadsheet contining the image file paths for each QR code in column 1. This column also needs to have a field label in row 1 which will be used as a reference in the mail-merge process later on. We used the label “qrcodes”.

Create and save this spreadsheet for later use.
Open Your Label Template
Either open your digital template in MS Word (we downloaded our Avery 22805 label template from the Avery website) or use one of the templates pre-loaded into MS Word.
- Select the “Mailings” command ribbon
- Select “Start Mail Merge” and then “Labels”. Choose the template you require and press OK, or if you have already opened your own downloaded digital template just press Cancel (don’t know why this step has to be done when using your own template, but it won’t work if you don’t)


The Mail-Merge Process
- Click on “Select Recipients” in the toolbar ribbon and then “Use Existing List” and navigate to the Excel data source file created above.

A dialog box will then appear – ensure that both “Sheet1” and “First row of data contains column headers” are both selected and press OK.

- Position the cursor in the first label cell:
- Press CTRL + F9 to open the curly brackets, type INCLUDEPICTURE and then a space.
- Press CTRL + F9 again, type IF TRUE and then a space.
- Press CTRL + F9 again, type MERGEFIELD and then the name of the field identifier you used in your Excel spreadsheet created above. We used “qrcodes” so we type that.
- Cursor across to the just before the last nested curly bracket and type \d.
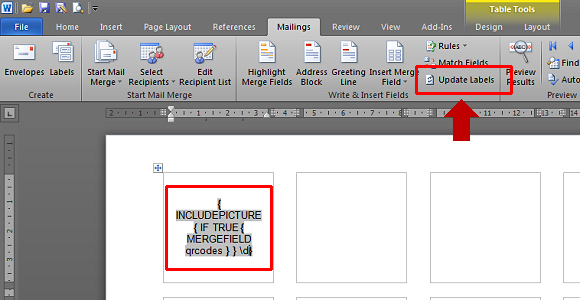
After completing these steps you should have ended up with the following in the first cell:
{INCLUDEPICTURE {IF TRUE {MERGEFIELD qrcodes}} \d}
NOTE: You can also include other columns of information in your data source (such as a text label associated with each QR code), and the scripting could be extended at this stage of the process to include another MERGEFIELD parameter that pulls that data into the label as well.
- Click on “Update Labels” which will populate all label cells with the mail-merge scripting. Each script is set up to pull consecutive images from your Excel data source file. eg; first listed QR code into the first cell, second QR code into second cell, third QR code into third cell, and so on.
- Click on “Finish & Merge” and select “Edit Individual Documents”. Select Merge “All” Records and click OK. This will run the script in each label cell and replace the actual script with the QR code image referenced in it.

A new document will be opened showing each of the individual QR codes in their own label cell.

Save and print. Done!
Create QR Codes in Bulk Using Our Batch Processing Feature
A standard part of the QR Stuff paid subscriber feature set is the ability to automatically generate batches of up to 500 QR codes by simply uploading a spreadsheet file containing the details of up to 500 QR codes. The end result is a whole heap of individually and uniquely named QR codes that are ready to be imported into a label template using the process outlined above.
Click here for our batch processing user guide, or visit our FAQ section.


Hilla Rosenberg,
Content Writer at QRStuff
Hilla is a seasoned content writer at QRStuff, passionate about making tech accessible and engaging. With a knack for breaking down complex topics, she helps businesses and individuals make the most of QR Code technology.